Posts

Adding ObjectID Pass to Render Output in Maya Part 2: The Script

In my previous post , Autodesk's article showed us how to create an ObjectId pass in our scene. In the last post I also posted a snippet of PyMel script that creates a unique Id number for each object so each one will turn up a uniquely different colour from its neighbour in the objectId pass. However the process still needed us to manually create a Mental Ray Output Pass in the camera's Mental Ray section. Since then I have gone on to write a PyMel script to automate the process. So here is the script. # -- code start -- from pymel.core import * def uniqObjIdAssign():     # Written by Patrick Woo     # usage:        # - make sure mental ray is loaded, and set as your current renderer     # - select the camera     # - then select all the objects to give unique objectIDs to, and run this script     # for more info go to:     # http://patrickvfx.blogspot.com/2014/11/adding-objectid-pass-to-ren...

Adding ObjectID Pass to Render Output in Maya

Image
(This article has a second part, with a more complete script, which you should check out later.  Read part 2 of this article ) So I was trying to find out how to generate ObjectIDs for Mental Ray renders in Maya. Peering into render passes and render layers settings, I could not find an objectId setting or preset. So I had to search the Internet for some answers. Here's a little help from Autodesk folks on how to generate object ID pass for your mental ray renders. http://knowledge.autodesk.com/support/maya/troubleshooting/caas/sfdcarticles/sfdcarticles/How-do-I-obtain-an-object-ID-pass.html Quoting from the page: -- start quote -- To obtain an object ID pass, please follow these steps: Select all the objects that you wish to include in the pass, and execute the following MEL script: addAttr -ln miLabel -at long -k 1; This will add a new attribute called “MI Label” for all the objects in the Extra Attributes section. Once you create a different MI Label for ...

Unity 3D Test with a Serial Port Ranging Sensor

Image
I've trying my hands at working with Unity3D, and getting used to the workflow, including scripting and working with external input devices. In this video I successfully get Unity to receive input from a Ranging Sensor connected to the computer via a serial port. When I put my hand within range, the code triggers the small cubes to move up, and the larger cube to turn red and rotating. After removing my hand for about 4 seconds the cubes are programmed to fall back to their original positions. The ranging sensor chips were programmed by someone else before hand. In the future I want to look into programming these chips as well! :)

Black Magic Releases Fusion 7 Absolutely FREE

Image
From the text message of an excited friend today, I learnt that Fusion 7 from EyeOn software has become absolutely free. This sounds like a bogus piece of news. However, a quick search through the internet confirmed the news! This is definitely exciting. From an article on the StudioDaily site , I found more news. Eyeon Software has been bought over by  BlackMagic Design  2 months ago, and Fusion will now be developed  by them. Fusion has a long-standing and solid history in the history of high-end compositing software for visual effects work in TV and Film. In its latest version, Fusion 7 comes in 2 flavours: Fusion 7 and Fusion 7 Studio. While Fusion 7 was originally US$2.495, it is now free. the Studio version now costs US$995 to upgrade to. Read here for a complete list that compares the two versions . When BlackMagic Design released Fusion for free, they want to continue their spirit of revolutionising the industry, delivering high quality and hig...

Setting Maya Viewport's Texture Resolution Above 256x256

Image
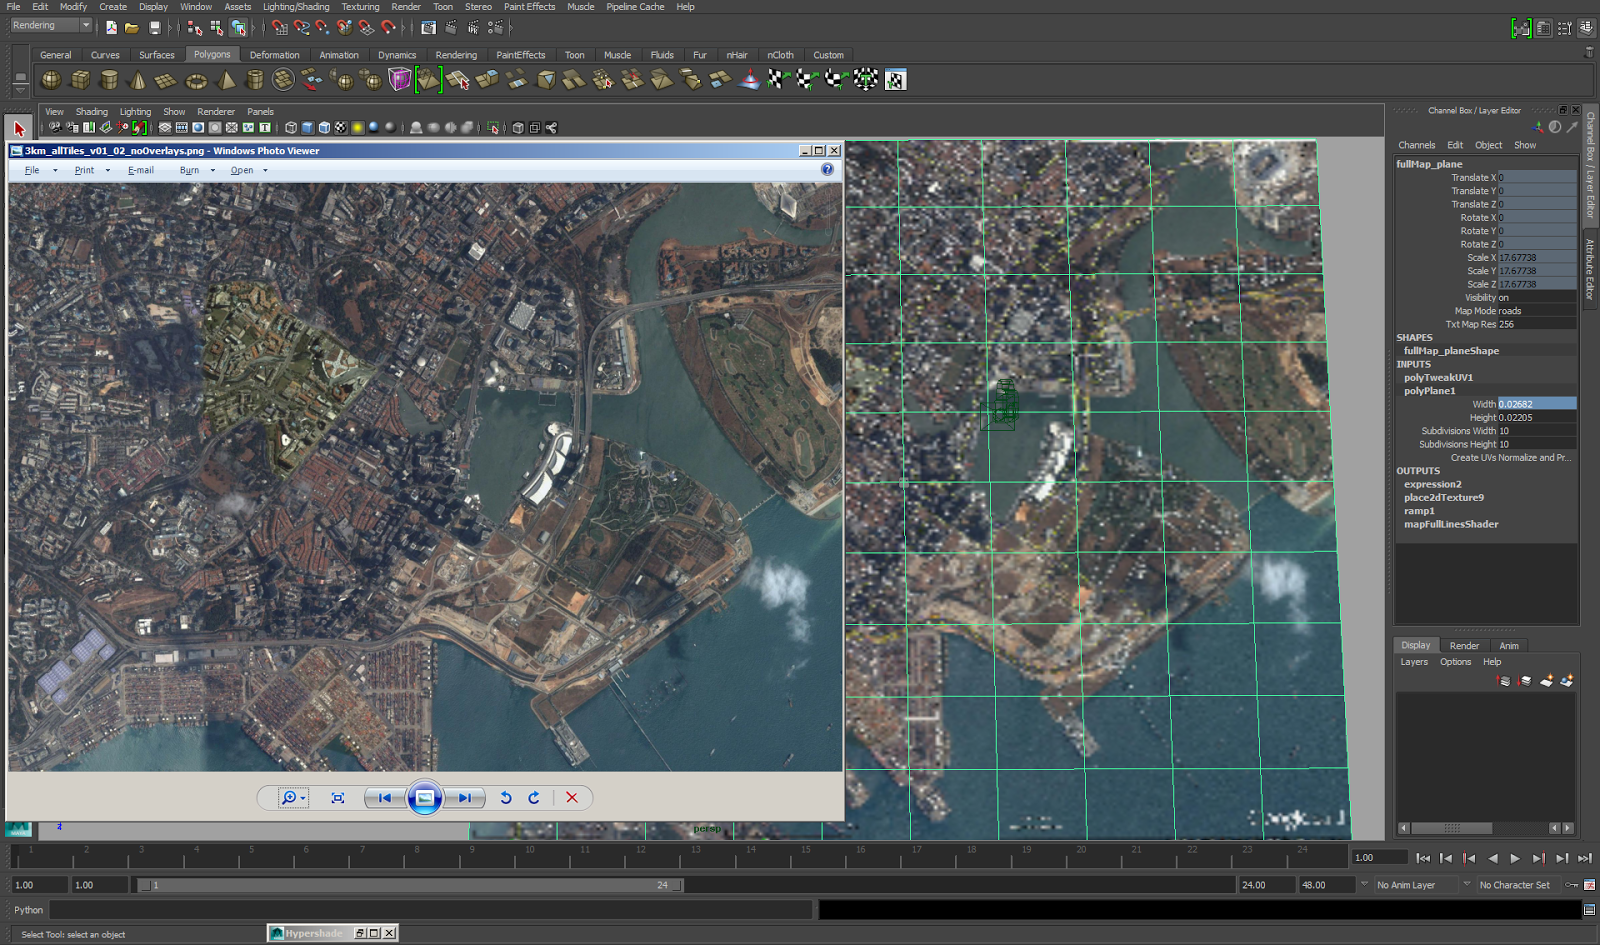
While working on a project that required me to display map features in very fine detail, I ran into the problem of Maya's limited ability to show texture maps at higher than 256x256 in the viewport. On the left is the source image supplied as a texture on the plane in the Maya scene, displayed from Window's image viewer. On the right inside of Maya is the same map that's loaded as a lower resolution map. In the hardware texturing setting for that shader (I'm using a surface shader), we soon find out that 256x256 is the highest resolution we can choose to show our texture at. Searching through the Internet I had the good fortune to come across this very useful tip on a blog that solved the problem for my situation: http://blog.erlendsakshaug.com/post/59585323349/maya-tip-set-texture-resolution-above-256x256-in-the To find out the current hardware texture resolution for the shader of this object, we have to find out the name of the shader. For me it is ...

AE World: Andrew Kramer Keynote Speech

Image
Here's a great keynote speech by Andrew Kramer of Video CoPilot , at AE World 2014. He has great humour, and it was very inspiring and motivating talk. It brings us to revisit the question of why VFX artists and motion graphics designer do what we do, and somehow it is a bit like rediscovering our first love as Andrew shared some of his adventures working in the industry. As a matured artist who is well skilled in his craft, he gives very sound advice that I feel, is very applicable to every artist across all artistic disciplines.  He has advice to artists just starting out, artists trying to find their direction, trying to get noticed, or even how we should be approaching our craft with relation to the other aspects of our lives.  All in all this was was great presentation, highly entertaining and with plenty of reminders and checkpoints for us to think about what we really want, where we really are, who we want to be and where we want to end up.

Using Shading Switch Nodes in Maya

Image
Here's a demonstration of the use of Shading Switch utility node. This tutorial shows how you can have a same shader with different properties when applied to different objects. This is a huge help when your scene and assets increase in complexity. With the switch shader node in your shader tree, there will be no need to maintain multiple copies of the same shader and keeping them in updated when one of the values change. For years I have tried to find out to do this since a very similar thing could easily be done in 3D Studio Max (creating instanced texture nodes). Finally I have found the solution on how to do this in Maya. I hope this is beneficial to you in some way. Enjoy! :)